NAAMA HADAD
DANIEL AMAR
RAVID LEVI

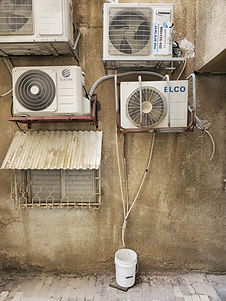
The facades of the houses that are currently characterized by a messy and clumsy appearance mainly because of the external air conditioners and the shaking pipes from them.
SITE AREA
During the summer months, the air conditioners operate very frequently and as part of the air conditioning mechanism emit water through a pipe out into the street.
Despite being distilled water with a huge potential for storage and use in an area with a desert climate like Be'er Sheva, we know that it is a nuisance in the public space.
The goal of our project is to create a positive use of this water in several ways.

THE PROCESS


Musical tile
Size- 15*90 cm
-
Making a hole in cans
-
Embedding the cans in the sand according to a location where the water will be able to pass from one reduction to the other
-
Creating a frame for sand casting
-
Plaster casting
-
Casting out
-
The casting broke in the middle so we glued a piece of ceramic to stabilize it
-
Gluing the cans to the casting
-
Cleaning and painting the tile with a textured book
-
trial run
!We took the dimensions of this tile and from it we cut the dimensions of the other two tiles in order to maintain proportions.


Water storage tile
size-30*15 cm
-
A study on the Pythagorean cup mechanism
-
Creating a Pythagorean cup in Reno
-
Export STL file for printing
-
Print one Pythagorean cup and test
-
Designing the tile - sketches and building a Reno model
-
Print of 3 Pythagorean cups
-
Embedding the cups in the sand according to the location where the water will be able to pass from one cup to the other
-
Creating a frame for sand casting
-
Plaster casting - this time thicker than the musical tile
-
Casting out
-
Printing of 3 new and clean glasses
-
Cleaning the casting
-
Gluing the new cups to the molding
-
Painting the glasses with oil paint - the spray does not stick to plastic or metal materials
-
Painting the tile with the spray, while keeping the openings of the cups covered so that the holes do not get blocked and water can pass through
-
trial run


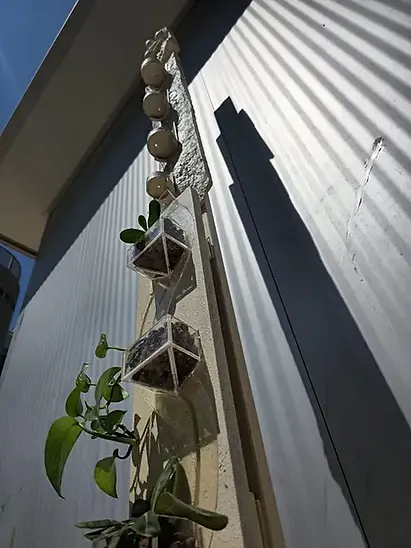
flowerpot tile
size- 15*60
-
Choosing a relevant size and amount of pots on the tile, in proportions that will match the other two tiles
-
Rhino modeling of each pot individually, layout of its parts, creation of lines for cutting Rhino and transfer to an AutoCAD file to cut them from Perspex with a laser.
-
Right next to the entire tile - a line that marks where the water will flow, the location of the pots on top of the line, the location of the plexiglass in relation to the water line.
-
To work with the cnc, you need to upload a Gcode file that directs the nibbler on which line to move when it is working and nibbling on the material. Therefore, for the water line
-
we chose a fine 3 mm router and drew one line. For the Perspex layer, a larger router was needed because there is a lot of space to lower -
-
we chose a 5 mm router and offset the contours of the shape inward.
-
We chose to assemble the pots on top of the layer of perspex that is embedded in the wood, therefore we made the back of the pot a part of the layer of perspex that is embedded in the wood and to that we will s
-
tick the rest of the parts of the pot.
-
Connecting the parts together
-
Milling a waterway in wood
-
Milling a place for plexiglass in wood
-
Laser cutting the backs of
-
flowerpots in Perspex
Laser cutting of flowerpot parts in Perspex -
Sanding the parts to a
-
connection angle where the water will not run out of the pot
Connecting the parts to the back of the plexiglass -
Painting the gnawed wood with balka to preserve the tile
-
Gluing the Plexiglas panel to the wood
!We couldn't put soil in the pots because the flow of water would sweep it away, so we used hydroton - light and special stones whose role is to replace the soil and the pots thrive on them.


Preparing the stand:
We attached the 3 pots to a 210 cm long wooden beam with equal spaces between them. The potted tile needed to be raised so that it would be in line with the other tiles and thus the water could flow freely.
We connected the wooden beam to a wooden base with iron fasteners and painted everything with the same base color we used before.
We lifted the wooden beam, put the hydroton balls in the pots and watered the plants in them.
We ran water through the tile a few times to make sure everything was working.
We saw that the water still does not enter properly into the teats' tile because the opening for the water is too narrow, so we cut and glued 2 pieces of plexiglass in front and behind and that solved the problem.
Beautiful topography for the tile, local context, use of local materials

Final project


.webp)

.webp)